#preview files using lightning web component
Explore tagged Tumblr posts
Visit Tumblr Blog
Explore Tumblr blogs with no restrictions, modern design and the best experience.
Last Seen Tumblr Blogs


Fun Fact
If you dial 1-866-584-6757, you can leave an audio post for your followers.
Text
Accelerate LWC Development With Salesforce’s Local Development Server

Tired of constantly deploying and refreshing your UI every time you update your Lightning web components (LWCs)?
With Local Dev (beta), you can streamline your workflow by developing your LWCs while previewing them in real-time directly within your Lightning app or Experience Cloud site.
Note: Before you begin make sure that you have the latest version of the CLI command, run “sf update��.
Step 1: Install the Local Dev Plugin To begin, install the Local Dev Plugin using one of the following commands based on your environment:
For Production or Scratch orgs:
sf plugins install @salesforce/plugin-lightning-dev
OR
sf plugins install @salesforce/plugin-lightning-dev@latest
For Sandbox environments:
sf plugins install @salesforce/plugin-lightning-dev@prerelease
Step 2: Enable Local Dev
Navigate to Setup in Salesforce.
In the Quick Find box, type Local Dev.
Select Local Dev and enable the feature.

Step 3: Enable Local Dev for Your Scratch Org
To configure Local Dev for a scratch org:
Open your SFDX project.
Locate the config/project-scratch-def.json file.
In the settings section of the file, add the following key “enableLightningPreviewPref”: true

Step 4: Preview
Use Local Dev to run a preview of the following types of Salesforce projects.
Lightning Experience apps (desktop and Salesforce mobile app)
LWR Sites for Experience Cloud
To preview your application, use the following steps:
Run the command below in the CLI to start the guided setup: sf lightning dev app
Alternatively, if you want to bypass the guided steps, you can directly use the following command in the VS Code terminal: sf lightning dev app — target-org — name — device-type — device-id — flags-dir
Replace the placeholders with the appropriate values for your project. This will launch the application preview.
Guided Steps When Running the Command sf lightning dev app:


Step 4: Build an LWC Component and Experience the Real-Time Magic of Local Dev (Beta).
Start by creating a Lightning Web Component (LWC).
Embed the LWC into any Lightning app. For now, you can add it to any page in the Sales App.
Make changes to your LWC, such as modifying the HTML, CSS, or JavaScript. As soon as you save your code, you’ll experience the power of Local Dev (Beta), with changes reflected in real-time on the UI.
Notice how quickly the LWC updates, without needing to deploy your code or refresh the page. The changes are applied instantly!
Considerations and Limitations:
LWCs automatically update for the following changes only.
1. Basic HTML revisions: Changing component attributes, like in our case
lighting-button variant=”neutral” to variant=”brand”
Get More info: https://www.kandisatech.com/blog-details/accelerate-lwc-development-with-salesforces-local-development-server
#Salesforce#salesforcepartner#Lightning#LWC#SalesforceDevelopment#salesforcelightning#SalesforceLWC#LWCDevelopment#usa#uk#salesforceconsultant
2 notes
·
View notes
Text
Enabling CSV data uploads via a Salesforce Screen Flow
This is a tutorial for how to build a Salesforce Screen Flow that leverages this CSV to records lightning web component to facilitate importing data from another system via an export-import process.
My colleague Molly Mangan developed the plan for deploying this to handle nonprofit organization CRM import operations, and she delegated a client buildout to me. I’ve built a few iterations since.
I prefer utilizing a custom object as the import target for this Flow. You can choose to upload data to any standard or custom object, but an important caveat with the upload LWC component is that the column headers in the uploaded CSV file have to match the API names of corresponding fields on the object. Using a custom object enables creating field names that exactly match what comes out of the upstream system. My goal is to enable a user process that requires zero edits, just simply download a file from one system and upload it to another.
The logic can be as sophisticated as you need. The following is a relatively simple example built to transfer data from Memberpress to Salesforce. It enables users to upload a list that the Flow then parses to find or create matching contacts.
Flow walkthrough
To build this Flow, you have to first install the UnofficialSF package and build your custom object.
The Welcome screen greets users with a simple interface inviting them to upload a file or view instructions.

Toggling on the instructions exposes a text block with a screenshot that illustrates where to click in Memberpress to download the member file.
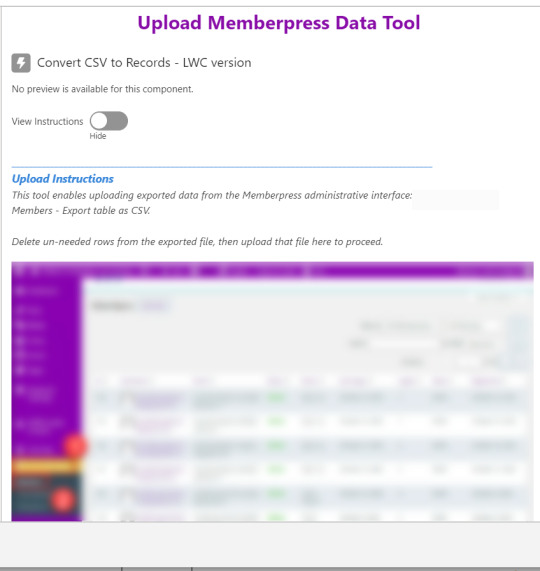
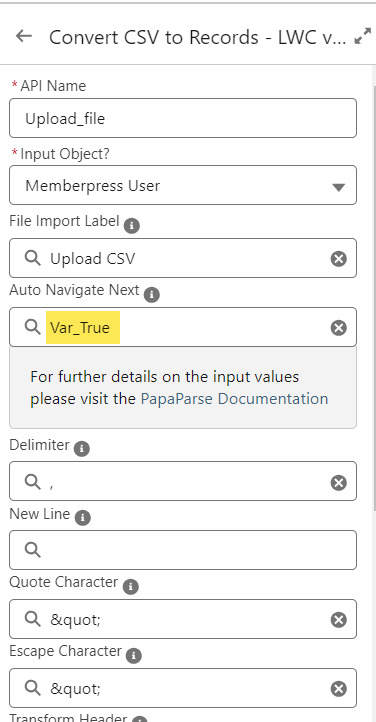
Note that the LWC component’s Auto Navigate Next option utilizes a Constant called Var_True, which is set to the Boolean value True. It’s a known issue that just typing in “True” doesn’t work here. With this setting enabled, a user is automatically advanced to the next screen upon uploading their file.
On the screen following the file upload, a Data Table component shows a preview of up to 1,500 records from the uploaded CSV file. After the user confirms that the data looks right, they click Next to continue.

Before entering the first loop, there’s an Assignment step to set the CountRows variable.

Here’s how the Flow looks so far..

With the CSV data now uploaded and confirmed, it’s time to start looping through the rows.
Because I’ve learned that a CSV file can sometimes unintentionally include some problematic blank rows, the first step after starting the loop is to check for a blank value in a required field. If username is null then the row is blank and it skips to the next row.

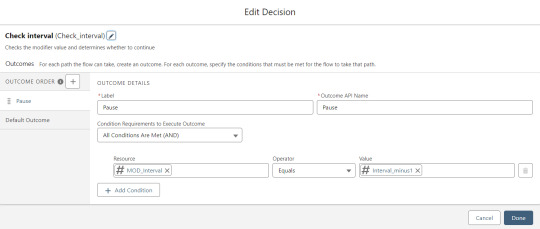
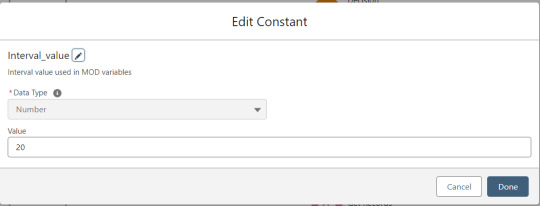
The next step is another decision which implements a neat trick that Molly devised. Each of our CSV rows will need to query the database and might need to write to the database, but the SOQL 100 governor limit seriously constrains how many can be processed at one time. Adding a pause to the Flow by displaying another screen to the user causes the transaction in progress to get committed and governor limits are reset. There’s a downside that your user will need to click Next to continue every 20 or 50 or so rows. It’s better than needing to instruct them to limit their upload size to no more than that number.

With those first two checks done, the Flow queries the Memberpress object looking for a matching User ID. If a match is found, the record has been uploaded before. The only possible change we’re worried about for existing records is the Memberships field, so that field gets updated on the record in the database. The Count_UsersFound variable is also incremented.

On the other side of the decision, if no Memberpress User record match is found then we go down the path of creating a new record, which starts with determining if there’s an existing Contact. A simple match on email address is queried, and Contact duplicate detection rules have been set to only Report (not Alert). If Alert is enabled and a duplicate matching rule gets triggered, then the Screen Flow will hit an error and stop.

If an existing Contact is found, then that Contact ID is written to the Related Contact field on the Memberpress User record and the Count_ContactsFound variable is incremented. If no Contact is found, then the Contact_Individual record variable is used to stage a new Contact record and the Count_ContactsNotFound variable is incremented.

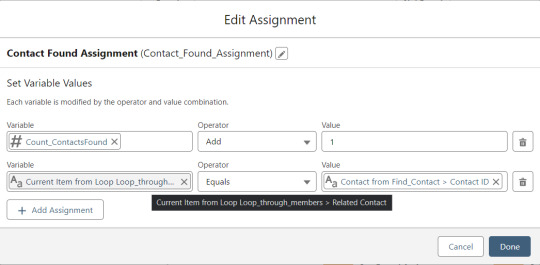

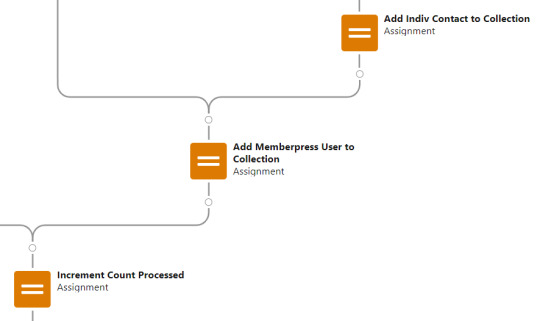
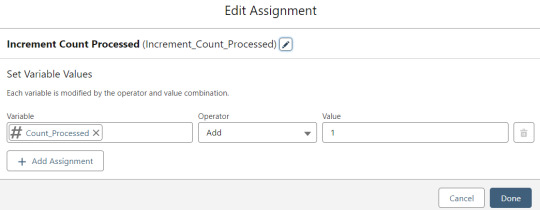
Contact_Individual is then added to the Contact_Collection record collection variable, the current Memberpress User record in the loop is added to the User_Collection record collection variable, and the Count_Processed variable is incremented.


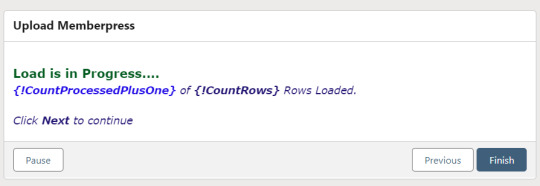
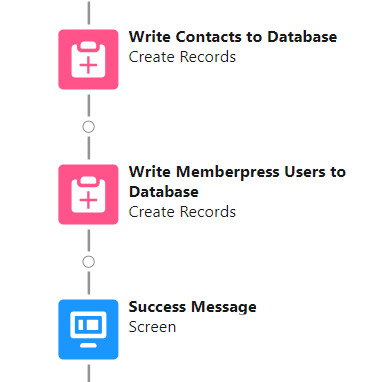
After the last uploaded row in the loop finishes, then the Flow is closed out by writing Contact_Collection and User_Collection to the database. Queueing up individuals into collections in this manner causes Salesforce to bulkify the write operations which helps avoid hitting governor limits. When the Flow is done, a success screen with some statistics is displayed.

The entire Flow looks like this:
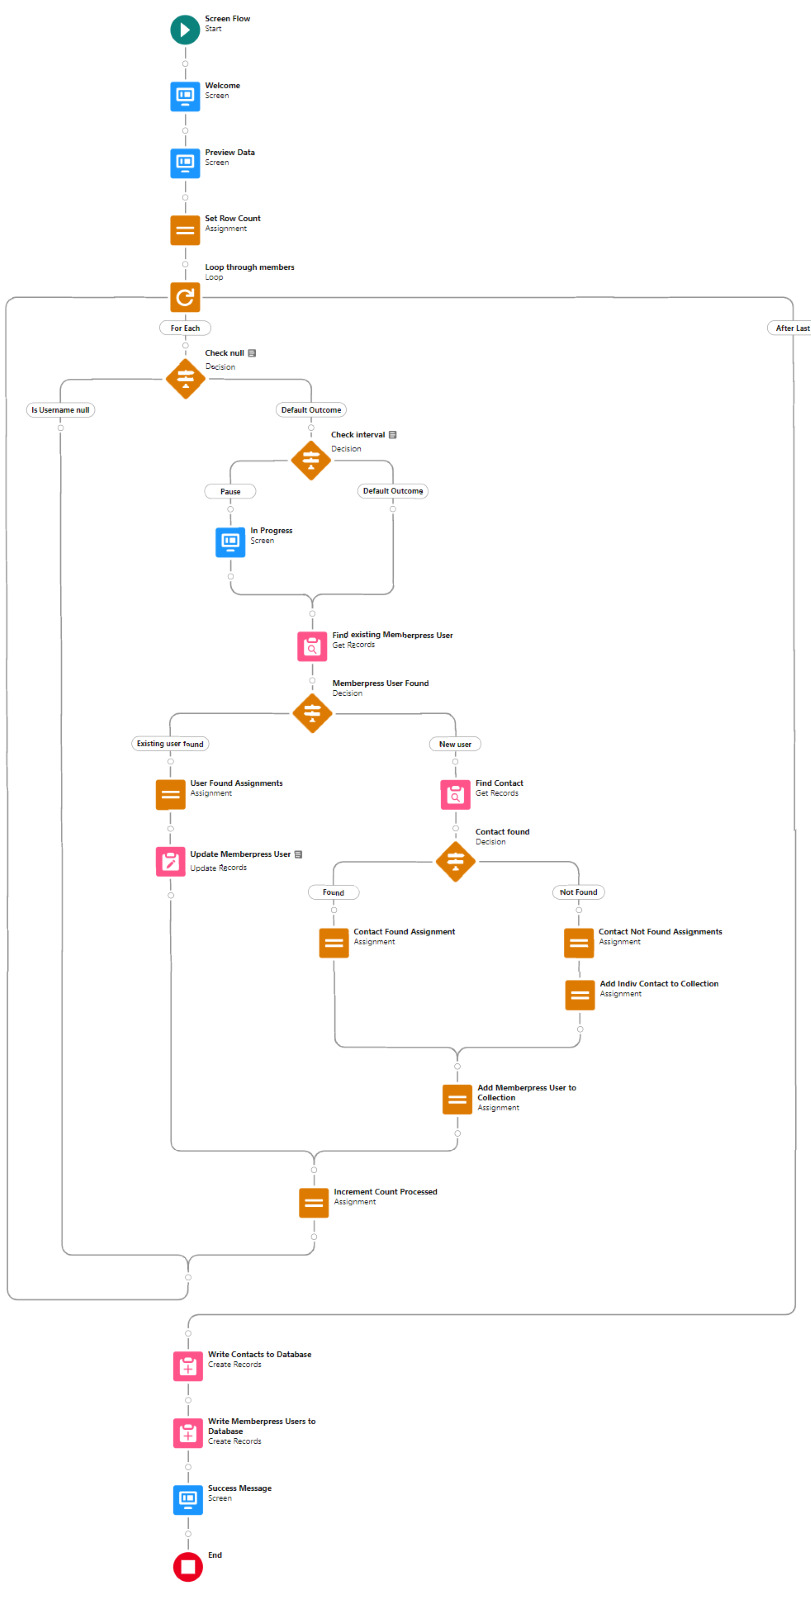
Flow variables
Interval_value determines the number of rows to process before pausing and prompting the user to click next to continue.
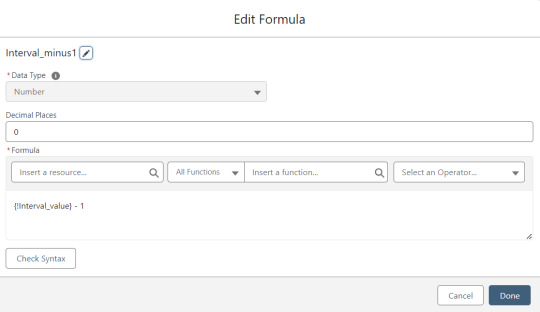
Interval_minus1 is Interval_value minus one.
MOD_Interval is the MOD function applied to Count_Processed and Interval_value.

The Count_Processed variable is set to start at -1.

Supporting Flows
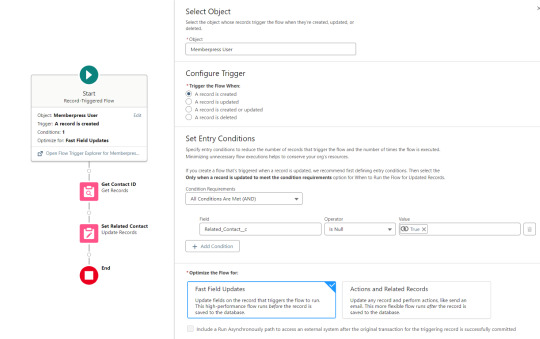
Sometimes one Flow just isn’t enough. In this case there are three additional record triggered Flows configured on the Memberpress User object to supplement Screen Flow data import operations.
One triggers on new Memberpress User records only when the Related Contact field is blank. A limitation of the way the Screen Flow batches new records into collections before writing them to the database is that there’s no way to link a new contact to a new Memberpress User. So instead when a new Memberpress User record is created with no Related Contact set, this Flow kicks in to find the Contact by matching email address. This Flow’s trigger order is set to 10 so that it runs first.
The next one triggers on any new Memberpress User record, reaching out to update the registration date and membership level fields on the Related Contact record

The last one triggers on updated Memberpress User records only when the memberships field has changed, reaching out to update the membership level field on the Related Contact record


0 notes
Text
Guidelines on How to Take the Perfect Photographs with the Android Smart phone
If perhaps you are working with any of the top of the line Android mobile phones, like the Galaxy S9 or Google Pixel 3, well then one of the recommended photo cameras available is currently inside your pocket or purse. You are prepared to start capturing all those friends and family images at special events that will go on endlessly. But whatever the expertise of the sophisticated smartphone, merely pointing and taking shots at the backdrop is not the best way to capture long lasting experiences. The same concepts apply to cell phones digital photography as they do studio photography: a little staging will go quite a distance. Have a beat before hitting the shutter key and employ one or more of the following tips to help to make your phone-snapped pics look their best. You’ve been told this before, however it requires repeating because it makes an mind-blowing impact: make sure the camera continues to be when you’re shooting a photograph. I can’t let you know how many times I have snapped and strolled to stay with an organization or something of the type, only to be dismayed down the road by fuzzy final results. Your Android cellphone may be fast at setting up the camera app (double-press the energy button of all to instantly fire it up), but it can’t constitute the photo if you aren’t quiet while taking it. It’s typically smart to get into the tradition of looking into what you just snapped before moving forward. You would not really need a tripod in this day and age to take a still photo, though it really allows elicit the most desirable outcomes. There are also smart phone surveillance camera mounts for common-sized tripods if you’re currently tricked out in camcorder gear. Alternately, unique items are impressive for capturing group photographs. Angling the phone against a wall or an object can be another technique of the trade in cases where you’re in a hole. Android Cellphone's Recommended Photography Programs Android application programs are in fact impressive enough to take care of processing raw photography files generated by DSLRs, so most of them may surely deal with editing a picture taken by a smart phone. Free software like Snapseed, Polarr Photo Editing, and Lightroom will charm to tinkerers and those who are the “friends and family photographer.” For individuals who like the appearance of filtered pictures, applications like VSCO offer over 100 kinds of millennial-colored flair, as well as a Color Story, which has some of the best filters for delivering to an Instagram market. Both apps are absolve to use, though they offer in-app buys to unlock a few of the popular aesthetics. If you’d rather not pay very much to create your photos looked aged, KujiCam is shamelessly fun to make use of, as well as your digital photographs will look like these were used another decade. In the event that you do screw up a snapshot and the moment in time has elapsed, use an application like TouchRetouch to move in and remove an out-of-place fingertip in the top side. Don’t ignore the touch-ups specs your phone does natively. Google Photos comes pre-installed on almost every recent Android unit and will be offering quick editing tools, including a handful of colored picture filters, a crop choice, and the ability to alter common components just like the color hue and exposure. (Google Photos offers automatic backup for your photos and movies, so make sure to take benefit of that, however you lose all of your cherished stories next time your cell phone drowns in a children's pool.) Samsung and LG’s particular gallery applications likewise have light editing and enhancing choices along the same lines. In the event you are being cheeky, you might even like some of the digital “stickers” bundled on Samsung’s Galaxy and Note cellphones. I prefer just a little sexy light. A dozen candle lights and some dimmed light bulbs will be the perfect way to signal to your friends that the house is certainly a warm one. This sort of lighting is usually undesirable for photographs, nevertheless, and even though your mobile phone’s manufacturer assured you among the best low-light photos, wonderful parties are not the place to test out this statement. Don’t be scared to incorporate a small amount of lighting in cases where the mood demands it. You don’t have to get anything extra; simply remove the top on a nearby lamp fixture or other equivalent and place it in front of your subjects, beside you if you’re the shooter. Additionally, avoid overhead lamps and lights. Just as much as recessed light looks great in person, it’s not good on photo camera. (There is a justification why actresses wear sunglasses each time they are inside, where there is often above the head light.) This same lightning tip helps diffuse these sorts of lighting situations and will make everybody in the picture look warm and alive. Your mobile phone’s flash can perform the very same thing in a pinch, though stay away from it as most of your light source, as it could make your get-together appear washed out. Alternately, you can use a friend’s mobile phone flashlight as a directional light beam of kind by pointing it at the position you want people’s faces to end up being lit. It can donate to some actually professional lighting effects. Do you believe you're among the lucky ones to have the Pixel 3’s Night time Sight enhancement? Be sure you’re applying it when the conditions needs it, like inside museums or poorly-lit historic buildings. This capability is coming soon to outdated Pixel cellphones and is available in the standard Android camera application, from the same display screen where you can transition between panorama setting and the like. On Samsung and LG smart phones, a similar functionality is hidden in the Professional or Manual settings. In this case, you’ll want to do a little of tweaking to the camera configurations to get the kind of picture you want. You don’t have to be a camera professional to access this, as most companies give live previews so that you can observe what the result can look like after a bit of adjusting. For ideal outcomes, leave everything on Auto except for the shutter speed, that is where you will see the actual difference in how much light camera can take in. And of course, don’t forget to lean it up against something while the shutter is open or you will finish up with a fuzzy photo. Face setting is among those defacto standard capabilities that now comes offered with every flagship mobile phone. It is like panoramic mode, except that you are required to use it often since it gives photos a little of a high-tech appearance. You don’t need to utilize it to take photos of people, either. This works just as well for pets, plants, or any other curious object. My favorite thing to accomplish with Portrait mode, whether I’m having a selfie or snapping a photo with friends I have not seen in more than 10 years, is to use it next to a simplified backdrop. A bare wall is wonderful for headshots, while a patterned wall structure adds a bit of flair. I really like the imitation “studio appearance” of the sorts of images, and you could get creative utilizing the lamp-light technique in a room. If carried out right, the result of your Portrait mode could appear as preened and polished as if taken on college picture day, plus they can also be photographs deserving enough to put onto a pack of holiday greeting cards in the next year. simplemente haga clic en el sitio web hasta que viene Finally and in fact the most plain and simple bit of advice on the list here, don’t forget to clean your camera lens prior to capturing a shot. The android is totally able at this time in the process to capture a high-resolution picture of the persons you care for, but it will not mean much if the lens is smudged up with finger grease and several other assorted dust. Even if you possess a case on with a camera covering, wipe that section clean on the inside and out to make sure that your photographs stay fantastic. If your smart phone is your only camera, you should always keep either a microfiber towel or a pack of camera lens-cleaning wipes. Buy them in large amounts and place them everywhere: in every single container you use and every single car you ride in. Photos are only just worth a million words if they are crystal-clear, and assuming you paid out in excess of this good deal on a brand new phone, then it needs to develop photo frame-worthy portraits.
0 notes
Text
Slider Revolution Responsive Joomla Plugin (Sliders)
Slider Revolution Joomla Plugin
Slider Revolution is an innovative, responsive Joomla Slider Plugin that displays your content the beautiful way. Whether it’s a Slider, Carousel, Hero Scene or even a whole Front Page, the visual, drag & drop editor will let you tell your own stories in no time!
Slider Revolution Highlights
Front Page Designer
Slider Revolution is not only for “Sliders”. You can now build a beautiful one-page web presence with absolutely no coding knowledge required. To get you started fast, we included a ton of premade examples that come with all assets included!
Create Beautiful One-Page Websites
Lots of Examples included
Works Great on any Device (Desktop, Tablet, Mobile)
No Coding Knowledge necessary!
Drag & Drop Visual Slider Building
Building sliders has never been easier! Even though Slider Revolution is sporting an impressive number of options, even beginners will manage to create beautiful presentations with our new, more intuitive workflow.
Text, Image, Video, Shortcode, HTML Content Layers
Complete Graphical User Interface
Custom Slide Content for different Devices
Full Control over Styles, Animations, Transitions
Fully Responsive Solution
We made sure that Slider Revolution looks great and is intuitive to use on every device, be it desktop computers, tablets or smartphones.
Works on Desktops, Notebooks, Tablets & Smartphones
Optimised for Android & Apple Devices
Custom Slide Content for different Devices
Fallback Options for Mobile Devices
True Multi-Media Content
We want Slider Revolution to integrate into your website as seamlessly as possible. Why not show any content with it?
Regular Image Display with Bulk Upload
HTML5, YouTube & Vimeo Video Support
Popular Social Media Content Stream
Navigation Designer
You get tons of navigation styles for bullets, arrows, tabs & thumbnails with Revolution Slider. The kicker is that you can now easily modify or create your own sets of navigation elements!
Arrows, Bullet, Tab, Thumbnail Navigation
Lots of “Ready to Use” Styles included
Markup and Style Builder with Preview
Export your own Navigation Sets!
We take Security Seriously
Our Slider Revolution Joomla Plugin is regularly audited by professional researchers at Dewhurst Security to make sure that it’s no threat to the security of your Joomla website.
Checked Joomla Plugin Security
Constantly Maintained ThemePunch Quality
Optimized Performance
Good looks aren’t everything, so we made sure that Slider Revolution also loads lightning fast!
Loaded core file size automatically scales with used features
Intelligent Lazy Loading options
SEO Optimization
Monitor and optimize all aspects of your sliders
Advanced Debugging Options
Visit our detailled FAQ Site
Alternatives to this Product
jQuery-only Version: Slider Revolution Responsive WordPress Plugin
jQuery-only Version: Slider Revolution Responsive jQuery Plugin
PrestaShop Version: Slider Revolution Responsive Prestashop Module
Magento Version: Slider Revolution Responsive Magento Extension
Opencart Version: Slider Revolution Responsive Opencart Extension
Plugin Features
The Technology
Our premise is “less is more” and that is reflected in the structure of our components. In order to incorporate so much functionality into our plugins, we make sure everything is build as modular as possible.
Fully Responsive & Mobile Specific Features
jQuery 1.7 – jQuery 2.x Supported
Lightning Fast Greensock Animation Engine
Powerful API functions
Smart Font Loading
General Options
We want Revolution Slider to be able to fulfill all slide based roles along with special functionality like carousels and hero blocks. If you can’t find a specific feature, feel free to ask us!
Hero, Carousel and Classic Slider Features
All Sizes Possible (Full Responsive + Revolutionary 4 Level Advanced Sizes)
Fullwidth, Fullscreen, Auto Responsive Slider sizes
Unlimited Sliders per page
Image BG Cover, Contain, Tiled, Alignment, etc.
WYSIWYG Drag & Drop Editor
Published / Unpublished Slides
Publish slides based on predefined Dates
Simple and Advanced Lazy Loading for Faster and SEO Optimized Slider Start
Link and Actions on Slides
Parallax Effects, full customizeable, combine with Ken Burns and other effects (Mouse / Scroll controlled)
Improved Light weight Ken Burns Effects (easier & faster)
World Premiere for advanced Action Building
Build Social Stream based Sliders
Quick and Easy building based on Slider, Slide and Layer Templates
Performance Monitor and better Performance Suggestions
Viewport based Slide Loading and Progress
Create Slider Defaults, Reset, overwrite single Settings due all slides
Save Slide, Slider, Layer, Animation as Template
Layer Capabilities
Layers have evolved from simple layers to become powerful scene building tools! Drag and Drop, Customize & Animate your way to your perfect slider.
Animation Builder
Huge Number of Possible Transitions
Create your custom animations
Set Start / End Time, Speed, Ease and Effects of any Layers
Show/hide layers on Slider Effects, Events, Actions
Add Unlimited Number of Layers
YouTube, Vimeo, Self-Hosted HTML5 Videos, Shapes, Buttons, Predefined Buttons as Layer
Set actions and links per Layers
Combine Actions over different Layers and slides
Option to Link to a Specific Slide via Layer
Toggle Animation, Classes, video functions via Layers
Variable Layer Image Sizes, full responsive and/or Device Size based
Design your Layers for different Device sizes after your needs
Option to Hide Layers on Any Devices
Slider Navigation
We have implemented almost all navigation types you can think of, which can be aligned anywhere on the stage. Be in full control with Slider Revolution Navigation!
Bullet, Button, Tabs and Thumbnail Navigation, single or mixed mode. Any position like outter,inner, aligned etc.
Left/Right, Top/Bottom Mouse Scroll events.
Vertical/Horizontal Keyboard actions
Mobile Touch Enabled (Optional)
Drag and Pull Carousel Feature
“Stop Slide Timer on Hover” Function
Auto-Hiding of Navigation with Delay Option
Optional Countdown Timer Line
Set position, color, size of Time Line
Set size, visibility, amount and behaviour of Thumbs, Tabs, Bullets, Arrows
Hide / Enable Navigation on Mobile Devices
Keyboard Navigation
Fancy Navigation Skins with Slider Preview
Video Features
AutoPlay – Always, only first time, skip first time, wait for action
Stop video on Blur, Play Video only in ViewPort
Rewind, or keep current progress time
Set Start and End time
Loop, “Loop and Progress” Slide
Fullscreen, fullwidth, boxed
Navigation features
Action based control (through other layers)
New Video API, Events and Methods to controll media outside of the Slider
Content Sources
Slider Revolution is not just your ordinary image & video slider any longer. Now you can also pull the sliders content from popular social media steams.
Custom-Build Content
Posts
Facebook
Twitter
YouTube
Vimeo
Flickr
Instagram
Get Involved!
Is there a feature you would like to see? We will go through all your feedback weekly and pick the most requested features to be included in a future update! Contact us via our Profile Form
Press Commentary for the WordPress Version
“Revolution Slider is an all around awesome plugin, and would be a solid addition to any site.” (WPExplorer) ”...all I can say is WOW. I can honestly say that I haven’t had as much fun with, or been blown away by the quality and experience of any plugin/slider/website building tool in…ever??” (Webdsignandsuch.com – “A look at the Revolution Slider – Steve Jobs would be proud”) “This is my favourite Slider plugin right now – props to Theme Punch for bringing us this one.” (Blogging Wizard) “I thoroughly enjoyed testing and using this plugin, and highly recommend it to all those of you who are looking for a slider plugin, especially if you plan to include some layer-based animation features to your slides.” (WP Mayor)
Recommendation #1
Best WordPress Plugins – Digital Trends
30+ Useful WordPress Slider Plugins – Creative Can
35+ Premium WordPress Plugins – To Put You A Step Ahead – Tripwire Magazin
80 Amazing jQuery Slider and Carousel Plugins – Creative Can
30+ jQuery Image Slider Plugins and Tutorials – Tripwire Magazin
25+ Cool WordPress Slider Plugins – Creative Can
Usage in Themeforest Themes
If you want to use Slider Revolution in your Theme here on ThemeForest purchase ONE extended license for EACH theme (as long as there is no Developer License available) you put on the marketplace! If you have questions about this agreement please Contact us Here
Ressources / Credits
iPhone 6 Plus Psd Vector Mockup
Psd iPad Air 2 Vector Mockup
The New MacBook Psd Mockup
Stroke 7 Icon Font Set
33 Trendy Retro Vintage Insignias Bundle Volume 3
from CodeCanyon new items http://ift.tt/2xqOTK4 via IFTTT https://goo.gl/zxKHwc
0 notes
Text
What’s New for Designers, August 2018
What’s old is new again; that’s the theme this month with new tools for designers with a few new tools that are rooted in the “old” concepts of design theory. From working with typefaces, to a color wheel, this roundup is packed with goodies. And then there are some new “new” tools as well, including a couple of cool 3D elements.
If we’ve missed something that you think should have been on the list, let us know in the comments. And if you know of a new app or resource that should be featured next month, tweet it to @carriecousins to be considered!
Font Playground
Font Playground is a tool to help you experiment with variable fonts and even export front-end code. Variable fonts, which are single font files that behave like multiple fonts, are gaining popularity, making this something you should probably experiment with.
Color Wheel Generator
Color Wheel Generator provides color-perfect matches for all hues around the color wheel in HEX format. Adjust settings such as hue, angle, saturation and lightness to see perfect matches from every location on the wheel.
Scale
Scale is a tool to help you see a color scale for actual use. See tints of a color in steps so you know exactly what colors will look like.
Rockstar
Rockstar is a dynamically typed Turing-complete programming language. It is designed for creating computer programs that are also song lyrics, and is heavily influenced by the lyrical conventions of 1980s hard rock and power ballads. (So, it is a super-fun programming language to experiment with.)
Fondu
Fondu is a smart contract building tool. The open-source contract is designed for launching an initial coin offering or crowdfunding campaign. Fill out the questionnaire and download your contracts.
Font Memory Game
The Font Memory Game can help you train your eyes to notice details in typography and better identify different typefaces. (It’s harder than you think!)
Fusion.js
Fusion.js is now available for public use. The Uber project is described as “is a good choice for someone looking for an open source boilerplate to build a modern, non-trivial web app.” It is a MIT-licensed JavaScript framework that supports popular libraries like React and Redux, and comes with modern features like hot module reloading, data-aware server-side rendering, and bundle splitting support. It provides a flexible plugin based architecture.
StyleURL
StyleURL lets you export and share CSS changes directly from Chrome DevTools so you can use it with an existing workflow. It generates a link which loads CSS changes into existing webpages automatically so that you can share tweaks visually.
Keyframes
Keyframes is a new online hangout for animators. You can chat about and share projects, ask questions and use the community as a learning tool to up your animation game.
Brandcast Team Edition
Brandcast Team Edition makes it easy for teams to work on code-free website design projects together. The tool allows marketing teams to create completely custom websites and interactive sales and marketing collateral without a single line of code. The release allows everyone – from designers to copywriters – to work on projects together within the interface.
Pair & Compare
Pair & Compare lets you find and preview font pairs. Test Google fonts (and more) right on the screen and change settings to match your project needs — background, text width, font size, line height and more.
Emoji Tweeter
Emoji Tweeter lets you create tweets from a desktop computer complete with emojis. It’s basically an emoji keyboard.
3D Cube Form
3D Cube Form makes you say “that’s cool.” The form tool is interactive and starts with a color picker — engaging, right? Then the user enters details based on form fields. It’s fun and different; it might not work for every project, but is definitely worth your time.
3D Toggle
3D Toggle is a cool animation that changes how you think about toggle actions. You’ll want to click it into action.
Malvid
Malvid is a tool to help you develop components with an interactive user interface so that you can preview and document web components as you create them. The tool analyzes your folder structure to turn files into a visual UI and it works using an API or CLI tool.
Podmap
Podmap is a cool data visualization tool that maps the world’s podcasts so you can find something new to listen to near you. Search by geolocation, podcast name or filter by country.
CoolHue
CoolHue is a JSON-rendered gradients palette. It includes 60 gradient options so you can add a trendy color effects to projects with ease. You can also grab CoolHue palettes for Photoshop or Sketch.
Tutorial: Animated SVG Neon Light Effect
The Animated SVG Neon Light Effect tutorial allows you to take a cool custom effect that you create in Adobe Illustrator and then move it to Sketch and export a sleek SVG image that is lightning fast for websites and apps. The step-by-step guide shows you how to do everything from creating the nifty effect to applying it for use (no more heavy gifs!). Plus, the tutorial includes downloadable project files to get you moving through the project with ease.
Aunofa Serif
Aunofa Serif is a tall and distinct serif typeface for display. The free version includes only uppercase characters. The paid version includes a script option as well.
Calibre
Calibre is a super-condense font that’s a fun choice for display with just a few words. The x-height is incredibly high in this uppercase font. It also includes numbers and a few glyphs.
Cleon
Cleon is a round sans serif appropriate for a variety of uses. It includes upper- and lowercase letters, numerals and some punctuation.
Deansgate Condensed
Deansgate Condensed is a clear and distinctive typeface that resembles the type used on street name signs in Manchester. Distinct characters include a point Z and points on the M and W.
Facon
Facon is a trendy display font in a ragged style. The letterforms include distinctive cutouts. It is an uppercase font with numbers and some special characters.
Mercy
Mercy is a highly readable sans serif with interesting curves for some of the letters – note the “M” in the image. It comes with a limited character set – just 69 elements – but does include italics of each.
Add Realistic Chalk and Sketch Lettering Effects with Sketch’it – only $5!
Source p img {display:inline-block; margin-right:10px;} .alignleft {float:left;} p.showcase {clear:both;} body#browserfriendly p, body#podcast p, div#emailbody p{margin:0;}
https://www.webdesignerdepot.com
The post What’s New for Designers, August 2018 appeared first on Unix Commerce.
from WordPress https://ift.tt/2BeUrd8 via IFTTT
0 notes
Text
What’s New for Designers, August 2018
What’s old is new again; that’s the theme this month with new tools for designers with a few new tools that are rooted in the “old” concepts of design theory. From working with typefaces, to a color wheel, this roundup is packed with goodies. And then there are some new “new” tools as well, including a couple of cool 3D elements.
If we’ve missed something that you think should have been on the list, let us know in the comments. And if you know of a new app or resource that should be featured next month, tweet it to @carriecousins to be considered!
Font Playground
Font Playground is a tool to help you experiment with variable fonts and even export front-end code. Variable fonts, which are single font files that behave like multiple fonts, are gaining popularity, making this something you should probably experiment with.
Color Wheel Generator
Color Wheel Generator provides color-perfect matches for all hues around the color wheel in HEX format. Adjust settings such as hue, angle, saturation and lightness to see perfect matches from every location on the wheel.
Scale
Scale is a tool to help you see a color scale for actual use. See tints of a color in steps so you know exactly what colors will look like.
Rockstar
Rockstar is a dynamically typed Turing-complete programming language. It is designed for creating computer programs that are also song lyrics, and is heavily influenced by the lyrical conventions of 1980s hard rock and power ballads. (So, it is a super-fun programming language to experiment with.)
Fondu
Fondu is a smart contract building tool. The open-source contract is designed for launching an initial coin offering or crowdfunding campaign. Fill out the questionnaire and download your contracts.
Font Memory Game
The Font Memory Game can help you train your eyes to notice details in typography and better identify different typefaces. (It’s harder than you think!)
Fusion.js
Fusion.js is now available for public use. The Uber project is described as “is a good choice for someone looking for an open source boilerplate to build a modern, non-trivial web app.” It is a MIT-licensed JavaScript framework that supports popular libraries like React and Redux, and comes with modern features like hot module reloading, data-aware server-side rendering, and bundle splitting support. It provides a flexible plugin based architecture.
StyleURL
StyleURL lets you export and share CSS changes directly from Chrome DevTools so you can use it with an existing workflow. It generates a link which loads CSS changes into existing webpages automatically so that you can share tweaks visually.
Keyframes
Keyframes is a new online hangout for animators. You can chat about and share projects, ask questions and use the community as a learning tool to up your animation game.
Brandcast Team Edition
Brandcast Team Edition makes it easy for teams to work on code-free website design projects together. The tool allows marketing teams to create completely custom websites and interactive sales and marketing collateral without a single line of code. The release allows everyone – from designers to copywriters – to work on projects together within the interface.
Pair & Compare
Pair & Compare lets you find and preview font pairs. Test Google fonts (and more) right on the screen and change settings to match your project needs — background, text width, font size, line height and more.
Emoji Tweeter
Emoji Tweeter lets you create tweets from a desktop computer complete with emojis. It’s basically an emoji keyboard.
3D Cube Form
3D Cube Form makes you say “that’s cool.” The form tool is interactive and starts with a color picker — engaging, right? Then the user enters details based on form fields. It’s fun and different; it might not work for every project, but is definitely worth your time.
3D Toggle
3D Toggle is a cool animation that changes how you think about toggle actions. You’ll want to click it into action.
Malvid
Malvid is a tool to help you develop components with an interactive user interface so that you can preview and document web components as you create them. The tool analyzes your folder structure to turn files into a visual UI and it works using an API or CLI tool.
Podmap
Podmap is a cool data visualization tool that maps the world’s podcasts so you can find something new to listen to near you. Search by geolocation, podcast name or filter by country.
CoolHue
CoolHue is a JSON-rendered gradients palette. It includes 60 gradient options so you can add a trendy color effects to projects with ease. You can also grab CoolHue palettes for Photoshop or Sketch.
Tutorial: Animated SVG Neon Light Effect
The Animated SVG Neon Light Effect tutorial allows you to take a cool custom effect that you create in Adobe Illustrator and then move it to Sketch and export a sleek SVG image that is lightning fast for websites and apps. The step-by-step guide shows you how to do everything from creating the nifty effect to applying it for use (no more heavy gifs!). Plus, the tutorial includes downloadable project files to get you moving through the project with ease.
Aunofa Serif
Aunofa Serif is a tall and distinct serif typeface for display. The free version includes only uppercase characters. The paid version includes a script option as well.
Calibre
Calibre is a super-condense font that’s a fun choice for display with just a few words. The x-height is incredibly high in this uppercase font. It also includes numbers and a few glyphs.
Cleon
Cleon is a round sans serif appropriate for a variety of uses. It includes upper- and lowercase letters, numerals and some punctuation.
Deansgate Condensed
Deansgate Condensed is a clear and distinctive typeface that resembles the type used on street name signs in Manchester. Distinct characters include a point Z and points on the M and W.
Facon
Facon is a trendy display font in a ragged style. The letterforms include distinctive cutouts. It is an uppercase font with numbers and some special characters.
Mercy
Mercy is a highly readable sans serif with interesting curves for some of the letters – note the “M” in the image. It comes with a limited character set – just 69 elements – but does include italics of each.
Add Realistic Chalk and Sketch Lettering Effects with Sketch’it – only $5!
Source p img {display:inline-block; margin-right:10px;} .alignleft {float:left;} p.showcase {clear:both;} body#browserfriendly p, body#podcast p, div#emailbody p{margin:0;} What’s New for Designers, August 2018 published first on https://medium.com/@koresol
0 notes
Text
What’s New for Designers, August 2018
What’s old is new again; that’s the theme this month with new tools for designers with a few new tools that are rooted in the “old” concepts of design theory. From working with typefaces, to a color wheel, this roundup is packed with goodies. And then there are some new “new” tools as well, including a couple of cool 3D elements.
If we’ve missed something that you think should have been on the list, let us know in the comments. And if you know of a new app or resource that should be featured next month, tweet it to @carriecousins to be considered!
Font Playground
Font Playground is a tool to help you experiment with variable fonts and even export front-end code. Variable fonts, which are single font files that behave like multiple fonts, are gaining popularity, making this something you should probably experiment with.
Color Wheel Generator
Color Wheel Generator provides color-perfect matches for all hues around the color wheel in HEX format. Adjust settings such as hue, angle, saturation and lightness to see perfect matches from every location on the wheel.
Scale
Scale is a tool to help you see a color scale for actual use. See tints of a color in steps so you know exactly what colors will look like.
Rockstar
Rockstar is a dynamically typed Turing-complete programming language. It is designed for creating computer programs that are also song lyrics, and is heavily influenced by the lyrical conventions of 1980s hard rock and power ballads. (So, it is a super-fun programming language to experiment with.)
Fondu
Fondu is a smart contract building tool. The open-source contract is designed for launching an initial coin offering or crowdfunding campaign. Fill out the questionnaire and download your contracts.
Font Memory Game
The Font Memory Game can help you train your eyes to notice details in typography and better identify different typefaces. (It’s harder than you think!)
Fusion.js
Fusion.js is now available for public use. The Uber project is described as “is a good choice for someone looking for an open source boilerplate to build a modern, non-trivial web app.” It is a MIT-licensed JavaScript framework that supports popular libraries like React and Redux, and comes with modern features like hot module reloading, data-aware server-side rendering, and bundle splitting support. It provides a flexible plugin based architecture.
StyleURL
StyleURL lets you export and share CSS changes directly from Chrome DevTools so you can use it with an existing workflow. It generates a link which loads CSS changes into existing webpages automatically so that you can share tweaks visually.
Keyframes
Keyframes is a new online hangout for animators. You can chat about and share projects, ask questions and use the community as a learning tool to up your animation game.
Brandcast Team Edition
Brandcast Team Edition makes it easy for teams to work on code-free website design projects together. The tool allows marketing teams to create completely custom websites and interactive sales and marketing collateral without a single line of code. The release allows everyone – from designers to copywriters – to work on projects together within the interface.
Pair & Compare
Pair & Compare lets you find and preview font pairs. Test Google fonts (and more) right on the screen and change settings to match your project needs — background, text width, font size, line height and more.
Emoji Tweeter
Emoji Tweeter lets you create tweets from a desktop computer complete with emojis. It’s basically an emoji keyboard.
3D Cube Form
3D Cube Form makes you say “that’s cool.” The form tool is interactive and starts with a color picker — engaging, right? Then the user enters details based on form fields. It’s fun and different; it might not work for every project, but is definitely worth your time.
3D Toggle
3D Toggle is a cool animation that changes how you think about toggle actions. You’ll want to click it into action.
Malvid
Malvid is a tool to help you develop components with an interactive user interface so that you can preview and document web components as you create them. The tool analyzes your folder structure to turn files into a visual UI and it works using an API or CLI tool.
Podmap
Podmap is a cool data visualization tool that maps the world’s podcasts so you can find something new to listen to near you. Search by geolocation, podcast name or filter by country.
CoolHue
CoolHue is a JSON-rendered gradients palette. It includes 60 gradient options so you can add a trendy color effects to projects with ease. You can also grab CoolHue palettes for Photoshop or Sketch.
Tutorial: Animated SVG Neon Light Effect
The Animated SVG Neon Light Effect tutorial allows you to take a cool custom effect that you create in Adobe Illustrator and then move it to Sketch and export a sleek SVG image that is lightning fast for websites and apps. The step-by-step guide shows you how to do everything from creating the nifty effect to applying it for use (no more heavy gifs!). Plus, the tutorial includes downloadable project files to get you moving through the project with ease.
Aunofa Serif
Aunofa Serif is a tall and distinct serif typeface for display. The free version includes only uppercase characters. The paid version includes a script option as well.
Calibre
Calibre is a super-condense font that’s a fun choice for display with just a few words. The x-height is incredibly high in this uppercase font. It also includes numbers and a few glyphs.
Cleon
Cleon is a round sans serif appropriate for a variety of uses. It includes upper- and lowercase letters, numerals and some punctuation.
Deansgate Condensed
Deansgate Condensed is a clear and distinctive typeface that resembles the type used on street name signs in Manchester. Distinct characters include a point Z and points on the M and W.
Facon
Facon is a trendy display font in a ragged style. The letterforms include distinctive cutouts. It is an uppercase font with numbers and some special characters.
Mercy
Mercy is a highly readable sans serif with interesting curves for some of the letters – note the “M” in the image. It comes with a limited character set – just 69 elements – but does include italics of each.
Add Realistic Chalk and Sketch Lettering Effects with Sketch’it – only $5!
Source from Webdesigner Depot https://ift.tt/2vGhCb0 from Blogger https://ift.tt/2KMSGTX
0 notes
Text
Your key to success as a designer: These tools and resources
For better or for worse, technology rules the day for most web designers. It usually takes money to compete for more money, whether it’s in business or in poker. Similarly, it takes technology to compete in a field like a web design. Here, technical skills, resources, tools, or a combination of the three are necessary. This is if you hope to make a living by producing products or providing a service. Graphics have become the preferred method of disseminating information over the web. Visual design has in many if not most cases replaced code as the technique of choice. You can be a certified design guru, or your technical skills might be somewhat limited. Either way, you’ll find some items to help you succeed in 2018 in our collection of favorite tools and resources. * Mason Mason offers a pre-packaged set of up-to-date front-end solutions to help you satisfy today’s digital product requirements. Mason’s front-end solutions will save your team hours of time and trouble by taking common front-end experiences—like login flows, sign-up experiences, content feeds, and more—and making it possible for anyone on your team to design, edit, and deploy them, no code required. Mason is the world’s first platform that enables you to build complete, customized front-end solutions, or collaborate with team members to achieve the same objectives without having to resort to code. Mason’s builder and library of pre-built solutions will enable you to precisely create a product that faithfully adheres to your company’s or client’s UI brand and style. Furthermore, anyone can build with or edit your Mason supplied features. If you need to update a Mason feature, it’s easily accomplished with the builder and changes are published live, no downtime or waiting for the next development cycle. Mason’s pre-coded blocks are designed with maintainability and reusability in mind. These prepackaged solutions address common functions like user registration, social media logins, password reset, and others needed for virtually any digital product. It’s free to start building; try Mason today! 2. Mobirise Mobirise is an offline app that gives Windows and Mac users a fast and simple way to create portfolios, landing pages, promo sites, small to medium-size websites, or other customer projects. Mobirise is also useful for rapid prototyping activities, and since it is offline you have full control over whatever the activity may be; plus, how and where you choose to host a product is entirely up to you. Mobirise is an excellent choice for non-technical types or anyone preferring a visual, drag and drop design approach. This offline app is free for both commercial and personal use. There’s never a need for coding, and since it is based on the latest Google AMP or Bootstrap 4 framework, your products will be mobile friendly and exhibit lightning fast performance. 1200+ website templates and blocks, and a huge selection of icons, fonts, and free images come with the package. * Elementor When you select a WP page builder that has amassed a huge user base in a short period of time, you know it’s authors were on to something. That’s the story with Elementor, a WordPress theme that can claim 900,000+ users over a span of less than two years. You might expect to pay a handsome price for a WP theme this popular. The truth is, this open source page builder is completely free, even though it contains all the web-building features you are likely to need. Elementor is currently adding a series of additional features that make up version 2.0. These features are being released incrementally through 2018. Visit the website, check out the designer-made templates, design elements, and other powerful features and be prepared to create stunning websites without the need for coding. * A2’s Fully Managed WordPress Hosting A2 Hosting is an extremely affordable WordPress hosting service noted for its fast, reliable, and scalable hosting capabilities. Site staging is easy to do and thanks to A2 Hosting’s Turbo Serve, you can expect 20X faster page loading speeds than many other hosting services are capable of providing. A2 Hosting will assist you with migrating from your existing hosting service – usually at no cost to you. You can expect automated backups and top-quality 24/7 support. * Goodiewebsite You should rely on a professional development team to get the most from your website design. Goodiewebsite connects both businesses and web designers with experienced, expert developers to provide reliable, cost-effective coding at competitive prices. The Goodiewebsite team specializes in smaller, 1 to 10-page websites. Prices start at $999. * monday.com Whether your team is made up of yourself and one other or consists of thousands spanning several continents, monday.com will relieve you and your fellow team members of having to work with burdensome Excel files, attending long drawn-out meetings, or planning projects on whiteboards. monday.com is a team management tool that is especially popular with the non-tech-oriented users because of its ease of use, and how it can boost team transparency and productivity. * LayerSlider LayerSlider will make an excellent addition to your design toolbox when you want to spice up a website with attention-getting sliders. This professionally-designed plugin offers much more than its name implies however. With the LayerSlider platform it’s easy to create mind-blowing slideshows, image galleries, landing pages, animated page blocks, and even entire websites. LayerSlider is responsive, it offers a wide variety of layout options, and it requires no coding or special technical skills to use. * Uncode – Creative Multiuse WordPress Theme Uncode users have a habit of building portfolio websites that stand out from the crowd, and in an amazingly short time. Visit the user showcase to see what others have done, come away with some ideas and inspirations of your own, and check out the new features like Shape Dividers, Slides Scroll, and the new and powerful Gallery Manager. Once you see Uncode’s possibilities, you won’t be able to wait to get started on your next project. * Houzez Building a website for a real estate agency would be hard enough when the tool you’re using is a multipurpose theme. Houzez relieves you of the burden and does so big time! This drag and drop WP theme features multiple listings formats, property management system, geolocation, search composer, payment systems, custom fields builder, and much more. * The Hanger The Hanger is a modern WooCommerce theme that can also be aptly described as “classy”; which is precisely what you want in a theme of this type. The Hanger is easy to set up and easy to maintain, and your clients will be impressed by the speed in which you can deliver quality eCommerce WordPress sites. Not only will they experience a quick turnaround, but the deliverables will precisely align with their brands and the brands they sell. * wpDataTables There’s no sense in settling for anything less than #1, which is what you get with wpDataTables, the premier WordPress plugin for creating colorful, easily maintainable, interactive, and responsive tables and charts. wpDataTables is so useful at working with huge amounts of complex data that many of its users made the switch to WordPress just so they could use it. The plugin accepts a variety of data sources and formats, including large MySQL tables. * WhatFontis.com Ever been in the situation where the client submits materials to modify butt nobody knows the font used in the headline? With a huge database of 450,000 commercial and free fonts, Whatfontis.com can help you find the font name or similar fonts in a few seconds. * FFonts.net FFonts.net is a 75,000 font directory. The fonts are free to download and are presented in 87 well-defined categories to help you in your search. You can look for a specific font or a particular font style. If you want a better idea of how your font will appear in actual use, you can write out and preview a stream of text. * Fluid UI “Fluid” suggests smooth and easy, which is exactly why Fluid UI belongs in your toolkit. The key to a successful prototyping venture lies in easy and real-time collaboration among teams and project stakeholders. With this web and mobile prototyping app, it’s a simple task to communicate via video presentations, animated model presentations, and live chat. Features include an extensive set of built-in design component libraries. * Pixpa This all-in-one platform allows photographers, artists, and other creative types to build professional portfolio websites, complete with in-built eCommerce stores, client proofing and blogging capabilities. Creatives enjoy working with Pixpa because they can manage their complete online presence, including hosting, from a single platform, as opposed to having to work with multiple tools and services. Pixpa is affordable as well and offers top-class 24/7 customer support. Conclusion Pick one or more of these tools or resources. You can expect to realize an uptick in workflow speed and quality of your deliverables. It can be a multipurpose theme, a specialty theme or plugin, or a collaboration tool. Perhaps, these are means to avoid having to code certain common website functions. Anyway, there’s something here for you. Read More at Your key to success as a designer: These tools and resources http://dlvr.it/QWTFQK www.regulardomainname.com
0 notes
Text
How to download files from Lightning Community using LWC
[Blogged] - How to download files from Lightning Community using LWC via @sfdc_panther Link - #Salesforce #AskPanther #SFDCPanther #LightningWebComponent @Salesforce @Trailhead @ApexHours @SalesforceDevs

Hi Everyone,
In this post, I am going to show you how to download and Preview the files from Lightning Community using Lightning Web Component.
Before we get started, let’s discuss the Object Structure of the files to know how the files get stored into Salesforce.
Content Document: – Represents a document that has been uploaded to a library in Salesforce CRM Content or Salesforce Files.
View On WordPress
#content document in salesforce#content version in salesforce#download files from lightning community#download files from lightning component#download files from lightning web component#download files from lwc#download files using lwc#files in salesforce#How to download files from Lightning Community using LWC#how to preview files using lwc#preview files using lightning web component
0 notes
Text
Building a 4K video editing PC for 2018
With 2018 at the door, some of us will start to imagine what our new computer will look like, and if it will be of-the-shelf or built for its purpose. I am building my own new machine and, interestingly enough, some companies, as MSI, think it is the best solution, if you’re willing to take the time to gather all components.
Since I first learned how to build my own computers that I build them, buying the different parts I consider will allow me to get the best solution for the least amount of money. It’s always a compromise, and I’ve learned to invest in such a way that my computers last for quite a while, although aware that some components will have to be exchanged, to give the PC a new lease of life.
For decades now I’ve built not only my own but also my two son’s machines, until the age they could decide by themselves which parts to buy to build their own computers. I’ve also helped others to define their best PC builds. Although sometimes, when faced with the need to build a new machine, I say to myself that I will buy a pre-built computer, in the end, I can never resist the experience of playing with the different parts to get my “dream machine”… within the limits of my finances. It’s a ritual I’ve lived through over and over, and one I am about to embark on now, again, as one of my older computers, used mostly for email and writing and photo editing for the web, is getting to a point where it takes a loooong time to get even the most simple things done. This means my actual machine will move to this task, and I will get a new computer, built around the new generation of processors and graphic cards.
Years ago, when looking for suggestions and inspiration, I would just open an issue of boot magazine, which from a certain moment on became Maximum PC, and devour the suggestions from the specialists there. Unfortunately, Maximum PC is no longer available, so I’ve to look elsewhere for some guidance. That’s when I found MSI suggestions for “The Productive 4k Video Editing PC Build”, subtitled “Perfection Comes From Within”.
MSI is a company known in the circles of computer gaming for its hardware solutions, so the fact that it took the time to suggest a PC for 4K video editing came as a surprise. Because gaming is an area that asks for powerful computers, it does somehow make sense, as 4K video or video in general also does. MSI advocates that the best solution for users who need to finish projects fast, efficiently and with the best quality, is to build their own PC. Although 4K video is not exactly my main goal, I must say they had my attention. I kept reading…
MSI believes that, especially when editing 4K video, users need more than the average pre-built workstation PC, and defend that “by building your own machine and selecting each component carefully based on your needs, it’s easy to get the best performance.” Having had that experience myself, I understand the logic. When you buy everything, you’re not restricted, for example, by a case that limits your potential to expand. One such example is with graphic cards, that in recent generations became so big they would not fit inside many cases, meaning to use them it was necessary to move the whole motherboard and components to a bigger case.
Buying a big case makes complete sense for me, not only because of the space available, but also because it means it is easier to better control the temperature of the components. It will also allow you to expand the number of internal disks, when you need the extra space, instead of having to buy multiple external solutions. Internal disks as a Seagate BarraCuda Pro 3.5-inch 10 TB hard drive, which is the fastest 10TB HD in the market today, running at 7200 RPM, are a good starting point for creative professionals, paired with a fast SSD to keep your OS and programs. Here MSI suggests an interesting approach: using multiple SSDs, separating the OC and the editing software installations, which “yields additional performance gains, further maximizing video processing performance.”
A crucial question at the moment is the number of cores your new processor offers. Here MSI says that “when editing 4K video files with professional performance-demanding software like Vegas Pro, you benefit from more ‘CPU Cores’ or processors cores for faster video processing. Each CPU core provides compute power to encode, render & export video files. Simply put: more cores equals faster video processing and more efficiency, even at higher resolutions.”
The builds recommended by MSI all use Intel CPUs, either the Intel X-Series, associated with MSI’s motherboard X299 SLI PLUS, with support up to 18 cores, or the Intel 8th Generation with the motherboard Z370 SLI PLUS, supporting up to 6 cores. The first motherboard offers 8 DIMM slots while the second has only 4 DIMMs. It’s at this point that you start to choose, as the motherboard will define how much you can expand the system in terms of memory. Building your own machine is an exercise in choosing wisely.
For video editing, continues MSI, “you can never have enough RAM or system memory. At least 16 GB RAM is recommended for Full-HD video editing. When handling 4K video content, 32 GB RAM or more is advised. When you edit videos in multiple streams at the same time, the amount and speed of your RAM affects the time it takes to process the video(s) and render previews.” Buying a motherboard that allows you to go beyond the RAM values currently being used means you can keep your system for a longer period of time simply by adding more memory, a faster processor and more powerful graphics card. That’s why the choice of motherboard is important. Buy it looking at the future.
Obviously, MSI is selling its products through this guide, so they point to the importance of the implementation of DDR4 BOOST technology on its motherboards. This is a completely isolated memory circuit design for DDR4 memory and keeps the memory signals between the CPU and RAM pure by preventing other signals from interfering. This helps your memory to perform at its best and delivers perfect stability at the same time.
One important aspect to remember is that these motherboards support both M.2 SSDs & U.2 SSDs, which are becoming popular these days. MSI says that “you can make your system run even faster by setting up M.2 SSDs in RAID 0 with ease, using the MSI M.2 Genie BIOS that significantly simplifies the process. Feel the benefits of the fastest SSD setup in just a few clicks.”
Storage is an essential element for video editors, and we mentioned earlier the 10TB Seagate BarraCuda Pro HD. But having motherboards offering at least eight 6Gb/s SATA ports for hard drives, as the SLI Plus do, means storage expansion is easy, especially when associated with a case offering hard drive trays.
With all the external connections you may expect, including plenty of USB ports on the rear and front, including Type-A & Type-C USB ports, the MSI SLI PLUS motherboard even has LIGHTNING USB 3.1 Gen2 ports, which enables two USB devices to transmit data up to 8 GB/s at the same time. Once you’ve chosen your motherboard, which is the core of your build, it is time to pick the other pieces and put them together.
You’ll have not only to know, but you also have to like – and have the patience – to build your PC, but believe me, it is a rewarding experience. The most important part, though, is not putting all the components together inside the box, but choosing the components for your specific needs. MSI has created specific pages on their website explaining everything you need to know to build your own PC, and to help you tailor-make your own build list, recommends one helpful resource: PCPartPicker .
PCPartPicker provides computer part selection, compatibility, and pricing guidance for do-it-yourself computer builders. Assemble your virtual part lists with PCPartPicker and the site will provide compatibility guidance with up-to-date pricing from dozens of the most popular online retailers. PCPartPicker makes it easy to share your part list with others, and its community forums provide a great place to discuss ideas and solicit feedback. I am using it to define all the components for my next PC build. Maybe going through MSI’s website and pages dedicated to “The Productive 4k Video Editing PC Build” will make you want to build your next machine.
The post Building a 4K video editing PC for 2018 appeared first on ProVideo Coalition.
First Found At: Building a 4K video editing PC for 2018
0 notes
Text
Ionic 3 UI Theme / Template App - iOS 11 style - Green Light (UI Elements)
Ionic 3 Green – Light iOS 11 style UI theme is here. Use 80+ layouts and build your Ionic 3 / Angular 4 mobile app. Save hours of developing and use 80+ beautifully designed HTML5 layouts. Choose functions that you need and combine hundreds of HTML5 UI components by your wish. Don’t break your head and build HTML5 mobile app from scratch – we did it for you! All main functions are here. You can make almost any app with our UI template app. We made really superb organized main SASS file with all needed variables in wish to provide developers low time consuming tool for fast and clean-code development of best mobile apps. You can change all app screens in one file to adjust it to your brand or client. By using our template you can quickly produce best mobile apps for Android and iOS. Now you have maximum flexibility and you can easy customize every theme to your needs to all 80+ layouts at once. In our Ionic 3 /Angular 4 UI components we expanded default Ionic’s features and functionalities and added them iOS 11 polishing. All elements are inspired by new iOS 11 but still made to look great also on Android devices. You can easy implement UI elements source code from Ionic 3 UI theme / template by following our well organized documentation. You just code (little bit), we do the design. Check our example demo app! Easy as cake. Happy coding! NOTE: If you plan to sell your application over Play Store or to have in-app purchase, you should buy extended license. Full feature list BUILT WITH SASS (Syntactically Awesome Style Sheets) – as name said: it is awesome! We made complete theming system over one super-organized main SASS file where you can change and adjust almost all variables in all 80+ layouts at once. With SASS you can fast customize our themes or even make new. We used world most popular hybrid app framework: Ionic 3. Develop your mobile web app front-end fast as lightning! 80+ finished layouts ready to use - build your mobile application over directives. Every directive contain 1-3 HTML5 layouts that can be very easily implemented. Of course you can customize it and create unique HTML5 mobile app. All you need to do is to provide content. 1 theme – all 80+ UI components are made in one visual style that you can complete almost any app. Unified graphic – all graphic elements are inspired by iOS 11 graphic style and they can be combined infinitely. Even if you want to combine UI components from different themes it is possible with just few tweaks. FULLY RESPONSIVE- Now all screensare responsive over ion-split-pane component. Also we included ion-grid in all components which is heavily influenced by Bootstrap’s grid system. FIREBASE BACKEND- Now is possible to change all static elements over Firebase. You can change texts (content texts, header texts…) icons and images in no time without need to go to code. PUSH NOTIFICATIONS- Engage your users over push notifications. Just follow our setup tutorial and start sending notifications over Firebase. GOOGLE ANALYTICS- Track your users behavior. Find our more about them. We set up Google Analytics to every screen so no click is lost. MAILCHIMP INTEGRATION- Collect leads for your mail campaigns and track results. Just change ID of your MailChimp list and you are done. GOOGLE MAPS API INTEGRATION- 3 new Layouts with Google Maps API component (Location details, About us and Full screen view). Satellite and Map functions enabled. Also Street View browsing is functional. QR CODE AND BARCODE SCANNER - Full funcional scanner for QR codes and Barcodes. One layout added for results of scanning. Support 15 code types for Android, 9 types for iOS. Also support more 15+ types of code for Windows and BlackBerry. FORM VALIDATION- All input fields are now update with validation. No more incomplete submits or empty fields. Many UI elements have animation and/or transparency – beautiful transparent animations which are more and more popular in web development. Icons – included wide range of 800+ Material Design icons from Materialdesignicons.com over Fontello font. No more different sized PNG’s – we make it over scalable SVG format. So you get a lot of Ionic icons. Everything tested too (and works great) on iPhone 4, iPhone 4s, iPhone 5, iPhone 5s, iPhone 6, iPhone 6s, iPhone 6 plus and iPhone 6s plus. Every UI element and layout work on Android 4.4 and up to latest Android version. We test it on Samsung Galaxy S7 (Android 6), Sony Xperia Z2 (Android 6), Samsung Galaxy J5 (Android 5.1), Sony M2 (Android 5.1), Samsung s4 (Android 4.4). Also we test it on GenyMotion. And everything works perfect. Clean code with comments - all HTML5, CSS3 and SASS files are well commented for easier and quicker development and customizing. Fonts changeable in one line of code – we used web fonts (Roboto and Lato) as Google suggest it but it is very easy to replace it in only one line of code in main SASS file (by changing URL to web font). Note: If you plan to change font we suggest that you change it with some web fonts that have same number of font weights. SASS/CSS blend modes – We made several blend modes (black & white photo, darkening and gradients) so every image in app will looks perfect and boost aesthetic side of your app. Users loves nice apps! CSS animations – in combination with Animate.css we produce several animated elements that will raise UX quality of your mobile app Images – through all themes there is just 4 sizes of images (200×200px, 600×300px, 600×150px and 130×220px). Backgrounds are full HD (1920×1080px). All other used sizes are made automatically. Colors – colors and color combinations of every Ionic 3 theme are made from iOS styliguides. Events – on every button we provide clickable “event” that you can override and customize by your needs. Also we set toasts for every “event”. Ripple effect – included in almost all UI components at hover state. All UI components list: Google Maps – 3 screen with implemented GMaps API. We included it in page About us whish is very usable for bussiness app and company presentations. Also there is page called Location details which main purpose is for restaurants or some other location based apps. And of course there is Full page screen if you want to have bigger overview of maps. Fucnionality as Satellite/Maps and Street View is also vailable. QR code & Barcode scanner - Fully funcional scanner with support for various types of code. There is also one themed screen for showing results of scanning. Our scaner supports: QR_CODE, DATA_MATRIX, UPC_E, UPC_A, EAN_8, EAN_13, CODE_128, CODE_39, CODE_93, CODABAR, ITF, RSS14, RSS_EXPANDED for Android. For iOS it support: QR_CODE, DATA_MATRIX, UPC_E, UPC_A, EAN_8, EAN_13, CODE_128, CODE_39, ITF. List Views – Four types of List Views: Expandable (3 layouts), Drag&Drop (3 layouts), Swipe to dismiss (3 layouts), and Google Cards (3 layouts). We used some elements of Ionic 2 framework but we weren’t happy how it looks so we upgrade and polish them to be prettier and easier to work with them. All of them have their own specific effects and functionalities. Also we added Appearance animations that can be combined with all five List Views for better look and user experience. In total 12 screens of List Views. Open source project used in this components: Sticky List Header Parallax Effect (4 layouts) – We made new component for Ionic 3 / Angular 4 and we combine it with Ionic 3 lists and get beautiful Material Design UI element. Open source project used: Elastic header with zoom. Left menu (1 layouts) – We used standard Ionic left menu (or side menu) ) and we designed it to match our theme combining gradients and photos with SASS/CSS blend modes. Login & Register (2+2 layouts) – Login with small but nice letter effect with HD images in background. 2 login screen + 2 register screen. Image Gallery (4 layouts) – Gallery and sub-gallery with cool Ripple effect. We also make full-screen image preview screen so you don’t need to code. Check buttons (3 layouts) -Matching styles for every of UI layouts. Splash screens – 3 Splash screens combined with Ken Burns effect (made from scratch by us) and several logo entrance animation. Typo and small components – Page with typography (h1…h6, p). All made with default Roboto and Lato fonts but you can easily replace it with font by your wish. We also added in SASS controlling variables for 3 levels of spans (small, medium, large), 3 levels of icon sizes (small, medium, large), 3 levels of badges (small, medium, large) and 3 levels of social icons (small, medium, large). Search bars (3 layouts) – search bars for quick implementation in your app that fit perfectly with every Ionic 2 theme. Wizards (3 layouts) – Two different layouts of wizards. Can be used for app usage intructions, intros, explanators etc. Spinners/loaders (10 types) – Made of animated SVG’s. Open source project used in this components: SVG-Loaders Technologies and open source projects To be able to make all of Ionic 2/Angular 2 components in Material Design we had to use several technologies and few open source projects. In documentation we have explained how to use this projects. Here is list what we used to bring our design to life: SASS (Syntactically Awesome Style Sheets) – Makers of SASS call it “CSS with superpowers”. And it is! Sass boasts more features and abilities than any other CSS extension language. Also it is completely compatible with all versions of CSS. Ionic 2 – it is open source mobile framework for developing hybrid mobile and web apps. With Ionic you can produce Android, iOS and Windows mobile apps at once. Angular 2 – Angular 2 is a structural framework for dynamic web apps. It lets you use HTML as your template language and lets you extend HTML’s syntax to express your application’s components clearly and succinctly. jQuery – jQuery is a fast, small, and feature-rich JavaScript library. It makes things like HTML document traversal and manipulation, event handling, animation, and Ajax much simpler with an easy-to-use API that works across a multitude of browsers. NgCordova – ngCordova is a collection of 70+ AngularJS extensions on top of the Cordova API that make it easy to build, test, and deploy Cordova mobile apps with AngularJS. AnimateCSS – “Just-add-water CSS animations” made by Daniel Eden is collection of beautiful CSS animations. Elastic header with zoom – is Ionic/Angular directive for elastic headers made by Ola Christensson. Why our customers love us? “Solve all your doubts!” Emmarango, Material Design UI Ionic Template app “Excellent. You saved me a lot of development effort. Great!” Alessandrotorres, Material Design UI Android Template app “Couldn’t pick one area for the 5 star review. Overall quality, design and usability are excellent. Support is also fantastic. Thanks for help. Luke” Betty8080, Material Design UI Android Template app< “One of the best in all respects.” Nikhil3831, Material Design UI Android Template app “Everything is clear. @developer, nice work” Satyagvns, Material Design UI Android Template app “Excellent work. thanks for sharing :)” Bisoncode, Material Design UI Android Template app “Most features required for app design and development available. We gone build an app for gozopping.com with this, and make our customer go mad.. thx a lot.” Ojalsuthar, Material Design UI Android Template app “Absolutely amazing.” Vanduh, Material Design UI Android Template app “Fantastic, thanks. I’m sure I’ll be buying more sources from you.” Henrik S., HD wallpaper Android Template App “Great design quality!” Dedania23, HD wallpaper Android Template App Excellent customer support We are offering FREE after sales support around. We care about your apps as much as you and we will help you in any way possible. FREE Lifetime Updates – get all the new features we add in each future update for free. Once you purchase, you can use our dedicated support where we quickly answer your questions. Includes great online documentation you can find and it’s constantly being updated with new material. Basic tutorials for newcomers about importing our template. Contact us at [email protected] Working hours: 09:00 – 16:00h, UTC+01:00. From Monday to Friday. Credits The images used in demos are not included in the downloaded ZIP file. All images belong to their rightful owners. Full lists of credits are here
0 notes
Link
Introducing Salesforce Code Builder Over the past three years or so, there have been huge improvements to developer productivity on the Salesforce Platform. Everything from Scratch Orgs, the Salesforce CLI, Salesforce Extensions for Visual Studio Code, to source tracking, source control, and Lightning Web Components has made existing Salesforce developers more productive while also making the platform easier to learn. However, there has also been a remaining gap; many developers are unable to use these great new features because they’re only available on desktop-based tools. Today, that changes. We are thrilled to introduce Code Builder, a web-based development environment fully optimized for Salesforce development and powered by Microsoft’s Visual Studio Codespaces. Code Builder is a full-featured version of Visual Studio Code running completely in the browser and backed by a powerful cloud-hosted developer environment. In just one click, you have a full environment without any setup or configuration. Code Builder comes with everything you need to build applications on the Salesforce Platform, including Salesforce Extensions, the Salesforce CLI, Git integration, and it’s authenticated to your current Salesforce org. What’s really amazing about Code Builder is that it isn’t just a lightweight editor that runs in the browser – every instance of Code Builder is backed by its own powerful Virtual Machine. This means Code Builder will allow you to do everything from simple code edits, to Lightning Web Component development and advanced Apex debugging. It also includes support for Node.js and Java, all without leaving the browser. A familiar, modern experience Code Builder brings to your browser the same interface, capabilities, and features as VS Code on desktop, and in a way that is completely tailored to Salesforce development. For existing users of VS Code, you can switch between either product without missing a beat. Code Builder comes setup for Salesforce development, with great productivity tools like ESLint and Prettier, along with rich code-editing features for all Salesforce languages and programming models. For those that have never used VS Code, but are familiar with Developer Console or Workbench, we want you to be comfortable as well while also bringing the latest productivity features to the web. Going forward, learning Salesforce development and tooling won’t be different depending on where you build – you pick the environment that is most comfortable for you and the tools will be the same. Lightning Web Components For the first time, developers can now write, debug, and deploy Lightning Web Components directly from the browser. Code Builder provides LWC developers with modern development features like code completion, inline documentation, refactoring, linting, and much more. Apex Previously, Apex developers had the choice of using the powerful VS Code Extensions or the light-weight Developer Console. Depending on your choice, you had a different set of capabilities available. For example, the Developer Console doesn’t provide rich code completion, refactoring, or debugging capabilities. With Code Builder, the choice of where you work no longer means giving up features. You can do everything in Code Builder, including using the rich Apex debugging capabilities. Org metadata Where you can access only a small subset of metadata in Developer Console, Code Builder provides access to the full metadata of an org. Using the Org Browser you can open any metadata type for inspection and editing. Once you make changes to your metadata, the change is saved instantly to your org. Application Lifecycle Management Code Builder isn’t just for working against a single org either. You can connect to or create multiple orgs of any type, like sandboxes and scratch orgs. All from within a single Code Builder instance. This means that Code Builder isn’t limited to the simple editing of org metadata. You can use it to script deployments between multiple orgs and test changes in scratch orgs. It also comes with source control integration so you can more easily adopt source-driven development. SOQL queries One of our goals with Code Builder is to consolidate the web-based builder experiences into a single, modern, and consistent tool. The first tool we have brought over from Workbench (and improved) is a SOQL Query Builder. This tool empowers anyone who needs to write and execute SOQL queries to do so with an easy to use graphical interface while also allowing for editing the query syntax directly for more advanced features. A powerful developer environment Code Builder isn’t just about what you can do in the browser, it’s also a powerful cloud-hosted developer environment. This means you can access the command line to run tools like the Salesforce CLI and save files to the disk which are persisted for the next time you come back. You can install any VS Code extension or customize the color theme. This is your environment to do with as you please. Build how you want, from where you want You may be asking if this means you’ll no longer need Visual Studio Code on the desktop. The answer is up to you. The great thing about Code Builder is that it runs all of the same extensions that desktop VS Code runs. This means everything we build for the desktop is now on the web. For you, it means you can choose where you want to work without sacrificing functionality. For some developers, they will mostly use VS Code on their desktop; others will work exclusively in the browser with Code Builder. Sometimes you might want to use the desktop as your primary environment, but maybe you’d like to try out some preview features. For that you could spin up a Code Builder instance and try them out without worrying about disrupting your primary environment. Lastly, Code Builder isn’t just for writing code – it’s for everyone who builds on the platform. If you want to use a visual tool to create SOQL queries and never write a line of code, then Code Builder is for you! But it also means you could use VS Code on the desktop. The SOQL Query Builder and all other features will be available as VS Code extensions that will come preinstalled in Code Builder, but can also be installed in VS Code to use on your desktop. In short, this means that no matter what type of building you’re doing, you can choose to work exclusively in the browser, use the desktop-based VS Code alone, or use both. And you won’t have to make a choice based on which feature is available where. This is a unified path forward for all developer tooling at Salesforce. The future of Salesforce web tools You might be wondering, does this mean we say goodbye to the Developer Console? We know you love the speed and simplicity of the Developer Console, but you also want the ability to build more productively, with code completion, refactoring, and powerful debugging. With Code Builder, every Salesforce developer can build better using the latest Platform features, while enjoying the full power of a modern IDE, preloaded with all of our tooling innovations over the past few years. And it’s instantly available in your browser – no setup or configuration required! Over the next year or so, we’ll provide builders and developers a unified experience, bringing the features they love from Developer Console and Workbench into Code Builder and desktop VS Code. Going forward, desktop and web tools for Salesforce will get all the same features. Excited about the SOQL Query Builder, but prefer to build on desktop VS Code? No problem! Everything built for the browser will be available on the desktop, and vice versa. Code Builder is in Pilot June 25, 2020 with a limited group of customers. If you’re interested in learning more, please reach out to your Account team at Salesforce… but we also want to hear from you directly. What does your ideal Salesforce developer experience look like? Take this survey to help inform our Developer Tooling roadmap. We deliver new releases for VS Code Extensions, the Salesforce CLI, Local Development, and more, on a weekly basis. What we do is also publicly available on GitHub, so open an issue and let us know how you feel! Finally, be sure to join us Thursday, June 25 at TrailheaDX, where you’ll be able to see Code Builder in action at the Unlock Developer Productivity with Modern, Open Tooling episode. We can’t wait to see you there! About the authors Nathan Totten is the product manager for Salesforce Developer Tools & Experiences. Claire Bianchi is the product manager for Code Builder and the Salesforce CLI.
0 notes
Link
Over the past three years or so, there have been huge improvements to developer productivity on the Salesforce Platform. Everything from Scratch Orgs, the Salesforce CLI, Salesforce Extensions for Visual Studio Code, to source tracking, source control, and Lightning Web Components has made existing Salesforce developers more productive while also making the platform easier to learn. However, there has also been a remaining gap; many developers are unable to use these great new features because they’re only available on desktop-based tools. Today, that changes. We are thrilled to introduce Code Builder, a web-based development environment fully optimized for Salesforce development and powered by Microsoft’s Visual Studio Codespaces. Code Builder is a full-featured version of Visual Studio Code running completely in the browser and backed by a powerful cloud-hosted developer environment. In just one click, you have a full environment without any setup or configuration. Code Builder comes with everything you need to build applications on the Salesforce Platform, including Salesforce Extensions, the Salesforce CLI, Git integration, and it’s authenticated to your current Salesforce org. What’s really amazing about Code Builder is that it isn’t just a lightweight editor that runs in the browser – every instance of Code Builder is backed by its own powerful Virtual Machine. This means Code Builder will allow you to do everything from simple code edits, to Lightning Web Component development and advanced Apex debugging. It also includes support for Node.js and Java, all without leaving the browser. A familiar, modern experience Code Builder brings to your browser the same interface, capabilities, and features as VS Code on desktop, and in a way that is completely tailored to Salesforce development. For existing users of VS Code, you can switch between either product without missing a beat. Code Builder comes setup for Salesforce development, with great productivity tools like ESLint and Prettier, along with rich code-editing features for all Salesforce languages and programming models. For those that have never used VS Code, but are familiar with Developer Console or Workbench, we want you to be comfortable as well while also bringing the latest productivity features to the web. Going forward, learning Salesforce development and tooling won’t be different depending on where you build – you pick the environment that is most comfortable for you and the tools will be the same. Lightning Web Components For the first time, developers can now write, debug, and deploy Lightning Web Components directly from the browser. Code Builder provides LWC developers with modern development features like code completion, inline documentation, refactoring, linting, and much more. Apex Previously, Apex developers had the choice of using the powerful VS Code Extensions or the light-weight Developer Console. Depending on your choice, you had a different set of capabilities available. For example, the Developer Console doesn’t provide rich code completion, refactoring, or debugging capabilities. With Code Builder, the choice of where you work no longer means giving up features. You can do everything in Code Builder, including using the rich Apex debugging capabilities. Org metadata Where you can access only a small subset of metadata in Developer Console, Code Builder provides access to the full metadata of an org. Using the Org Browser you can open any metadata type for inspection and editing. Once you make changes to your metadata, the change is saved instantly to your org. Application Lifecycle Management Code Builder isn’t just for working against a single org either. You can connect to or create multiple orgs of any type, like sandboxes and scratch orgs. All from within a single Code Builder instance. This means that Code Builder isn’t limited to the simple editing of org metadata. You can use it to script deployments between multiple orgs and test changes in scratch orgs. It also comes with source control integration so you can more easily adopt source-driven development. SOQL queries One of our goals with Code Builder is to consolidate the web-based builder experiences into a single, modern, and consistent tool. The first tool we have brought over from Workbench (and improved) is a SOQL Query Builder. This tool empowers anyone who needs to write and execute SOQL queries to do so with an easy to use graphical interface while also allowing for editing the query syntax directly for more advanced features. A powerful developer environment Code Builder isn’t just about what you can do in the browser, it’s also a powerful cloud-hosted developer environment. This means you can access the command line to run tools like the Salesforce CLI and save files to the disk which are persisted for the next time you come back. You can install any VS Code extension or customize the color theme. This is your environment to do with as you please. Build how you want, from where you want You may be asking if this means you’ll no longer need Visual Studio Code on the desktop. The answer is up to you. The great thing about Code Builder is that it runs all of the same extensions that desktop VS Code runs. This means everything we build for the desktop is now on the web. For you, it means you can choose where you want to work without sacrificing functionality. For some developers, they will mostly use VS Code on their desktop; others will work exclusively in the browser with Code Builder. Sometimes you might want to use the desktop as your primary environment, but maybe you’d like to try out some preview features. For that you could spin up a Code Builder instance and try them out without worrying about disrupting your primary environment. Lastly, Code Builder isn’t just for writing code – it’s for everyone who builds on the platform. If you want to use a visual tool to create SOQL queries and never write a line of code, then Code Builder is for you! But it also means you could use VS Code on the desktop. The SOQL Query Builder and all other features will be available as VS Code extensions that will come preinstalled in Code Builder, but can also be installed in VS Code to use on your desktop. In short, this means that no matter what type of building you’re doing, you can choose to work exclusively in the browser, use the desktop-based VS Code alone, or use both. And you won’t have to make a choice based on which feature is available where. This is a unified path forward for all developer tooling at Salesforce. The future of Salesforce web tools You might be wondering, does this mean we say goodbye to the Developer Console? We know you love the speed and simplicity of the Developer Console, but you also want the ability to build more productively, with code completion, refactoring, and powerful debugging. With Code Builder, every Salesforce developer can build better using the latest Platform features, while enjoying the full power of a modern IDE, preloaded with all of our tooling innovations over the past few years. And it’s instantly available in your browser – no setup or configuration required! Over the next year or so, we’ll provide builders and developers a unified experience, bringing the features they love from Developer Console and Workbench into Code Builder and desktop VS Code. Going forward, desktop and web tools for Salesforce will get all the same features. Excited about the SOQL Query Builder, but prefer to build on desktop VS Code? No problem! Everything built for the browser will be available on the desktop, and vice versa. Code Builder is in Pilot June 25, 2020 with a limited group of customers. If you’re interested in learning more, please reach out to your Account team at Salesforce… but we also want to hear from you directly. What does your ideal Salesforce developer experience look like? Take this survey to help inform our Developer Tooling roadmap. We deliver new releases for VS Code Extensions, the Salesforce CLI, Local Development, and more, on a weekly basis. What we do is also publicly available on GitHub, so open an issue and let us know how you feel! Finally, be sure to join us Thursday, June 25 at TrailheaDX, where you’ll be able to see Code Builder in action at the Unlock Developer Productivity with Modern, Open Tooling episode. We can’t wait to see you there! About the authors Nathan Totten is the product manager for Salesforce Developer Tools & Experiences. Claire Bianchi is the product manager for Code Builder and the Salesforce CLI.
0 notes
Link
Discover Summer ’20 Release features! We are sharing five release highlights for Developers and Admins, curated and published by our evangelists as part of Learn MOAR. Complete the trailmix by July 31, 2020 to get a special community badge, and unlock a $10 contribution to Libraries Without Borders (Bibliothèques Sans Frontières). Salesforce releases three major updates a year and it’s time for Summer ’20. While waiting for the release, developers, admins and architects refer to the release notes to figure out what new features can best serve their business. We in the Developer Evangelism team are no stranger to this process and we’ve been busy updating the Sample Gallery to give you some developer highlights for Summer ’20. We’re only a month away from the release date, and here’s your opportunity to get a sneak peak of upcoming new features. About the Sample Gallery The Sample Gallery is a set of reference apps that showcase a range of low-code to pro-code developer features of the Salesforce platform. Each sample app takes an idea and implements it on the Salesforce platform along with other related apps. It features mobile apps, external-facing web apps, integrations and more. You can read about all the apps on the Sample Gallery homepage which also contains links to source repositories for each app. Sample app release process Just before the Salesforce release becomes generally available, the Developer Evangelist team starts working on sample app updates. We start by going through the release notes and collaborating with Product Managers to build a list of new features and updates. We then sort that list into three categories: “Must have” for all apps (updating version numbers, replacing workarounds…) “Should have“ features for demonstration purposes in specific apps Other items that are either not a priority for a developer audience or that cannot be adapted into use case examples We then distribute the work between people who maintain the sample apps. We use a unified branching strategy across all of our sample apps. We begin by creating a prerelease/summer20 branch out of the master branch. We then work with Pull Requests (PRs) on those prerelease branches to incorporate the various features. Finally, when we are ready to release the sample app, we merge the prerelease branch back into the master. Since all sample apps are Open Source, you can see our progress at any time by checking out the content of the prerelease/summer20 branches. You can see upcoming changes and if you have access to a prerelease org like a sandbox, you can even deploy the apps (but keep in mind that these are a work in progress at this stage). Now that you’re familiar with the process, let’s take a look at the Summer ’20 Release highlights. Sample app update highlights for Summer ’20 Cross UI technology communication with Lightning Message Service As of Summer ’20, Lightning Message Service (LMS) is now Generally Available (release notes, documentation). This feature is by far the one that had the biggest impact across all sample apps for this release. LMS is a client-side technology that allows for communication between Visualforce, Aura and Lightning Web Components. It also allows for communication between sibling components. Bye bye custom pubsub implementation, hello standard Lightning Message Service! Deploying LMS allowed us to remove pubsub, a custom JavaScript implementation that was copied in all sample apps. pubsub was originally intended as a temporary workaround while waiting for a standard implementation (LMS), and now we can now safely discard it. Note: If you have copied pubsub in any of your projects, make sure to replace it with LMS. Let’s take a practical example with one of our sample apps: the E-Bikes’ Product Explorer page below. This page lets you search for bikes and look at product details. There are three components: productFilters, productList and productCard. We use LMS to communicate across the components. Each component sends and/or receives messages that are triggered when the user interacts with the components in the following ways: When product filters change, productFilter sends a ProductsFiltered message that updates the product list accordingly. When a product from the list is selected, productTileList sends a ProductSelected message that updates the product card with the product detail information. We won’t dive into the code details here for the sake of brevity, but you can take a look at the source code in the GitHub repository and refer to this blog post to learn more about Lightning Messaging Service. CSS sharing among Lightning Web Components In LWC, you can easily share JavaScript among components (see this example in LWC Recipes). With Summer ’20 you can now also share CSS among components. This lets you easily create a consistent look and feel by using a common CSS module. In other words, no more CSS copy/pasting! We used this feature in LWC Recipes to reduce the amount of duplicated CSS. For example, the compositionIteration and compositionBasics components had identical CSS files. In order to fix that, we created a new “component” with just a CSS file and a metadata file like this: cssLibrary ├──cssLibrary.css └──cssLibrary.js-meta.xml We placed the duplicated CSS content from our two components into cssLibrary.css. Then, we simply replaced the content of our two components’ CSS files with this import statement to finish. @import 'c/cssLibrary'; Lightning page metadata update With the introduction of Dynamic Forms (non-GA preview), the metadata structure of FlexiPages (commonly known as Lightning pages) is updated to accommodate both fields and components. This update is completely transparent in orgs but it requires some manual XML transformation if you work with a project in source format. In short, these are the instructions for updating the XML to the new format: componentInstances tags are renamed to componentInstance (note the use of singular). componentInstance tags needs to be nested under a itemInstances parent tag. For example, this was the structure of the Hello FlexiPage from LWC Recipes prior to Summer ’20: In Summer ’20, the FlexiPage is now updated to the following structure: Tip: Speed up the update process by using search and replace on all .flexipage-meta.xml files in your IDE: Replace all instances of with Replace all instances of with Optionally, use a tool to reformat the documents. Application Lifecycle Management and tooling updates On top of the Summer ’20 updates, we’ve also been working on some Application Lifecycle Management (ALM) and tooling updates to help us automate certain tasks. We’ve migrated Easy Space Continuous Integration (CI) from CircleCI to GitHub Actions in an effort to standardize all CI workflows for the sample apps. We’ve also deployed a number of GitHub Actions across all repositories such as an automated welcome message for new issues, an issue auto assignment rule, and some scheduled actions around stale issues and pull requests. What’s next Summer ’20 brings many other great features (Einstein OCR, new Flow triggers, user permission checks in Lightning Web Components just to name a few) that we haven’t integrated yet. We’ll continue to add new features to the prerelease branches. We also plan to improve packaging, add more tests and improve code coverage for all repositories. Additionally, two new sample apps will be released in the near future, but details will remain a secret for now Make sure to visit the Sample Gallery to discover the different apps and check out the latest app version from GitHub. About the Author Philippe Ozil is a Principal Developer Evangelist at Salesforce where he focuses on the Salesforce Platform. He writes technical content and speaks frequently at conferences. He is a full stack developer and enjoys working on robotics and VR projects. Follow him on Twitter @PhilippeOzil or check his GitHub projects @pozil.
0 notes
Link
Just a few weeks ago we announced that we open sourced Lightning Web Components – which is a core UI technology for building applications on the Lightning Platform. Now developers can leverage the same framework plus their gained skills for building performant and reusable web applications on Salesforce and other platforms. This blog post will give you an overview of the major differences that you will discover between building Lightning Web Components (LWC) on Lightning Platform compared to their open source version. Tooling The first notable difference is tooling. For developing on Lightning Platform you’d use something like the Salesforce Extensions for Visual Studio Code for building Lightning web components and Salesforce CLI for deploying them to an org. In the future, there will also be cool enhancements like LWC Local Development (register here for a recording of our preview webinar). Building with LWC Open Source is different. First, there is no official IDE support. So while you can pick and choose your IDE, you won’t get things like code completion, automated imports, and so forth for LWC (besides the standard JavaScript and HTML features that an IDE offers). This can be a bit more time consuming when you start, so keep the LWC Open Source documentation site bookmarked. At the same time you can use the same general purpose tools like Prettier, ESLint, or Jest. Second, you can choose your tooling. You can decide to build your own toolchain, for example using custom webpack or rollup.js based projects to build and compile your LWC projects. Or you can use lwc-create-app, which is an open source tool that bundles common development activities like project local development, creating production builds, unit testing and more, into the single npm dependency lwc-services. It follows (mostly) the pattern of other popular UI framework tools like Vue CLI or create-react-app, so if you’ve developed with those frameworks, you’ll be familiar with the experience. To get started is simple: you must have node 10.x (the current LTS version) installed on your computer. Then run this command: npx lwc-create-app your-app-name After the guided wizard experience you’ll have a complete project scaffolding, where you can directly start the exploration by running npm run watch. When you look at our LWC Recipes OSS sample application you’ll see the different pre-defined scripts and more. It’s a fast start, so give it a try! Pre-build UI components Another notable difference between building Lightning web components on the Lightning Platform or on Open Source is the availability of Base Lightning Components. These pre-build components are not available on Open Source. The simple reason behind this is that LWC represents the core technology to build Lightning Web Components. And Base Lightning Components are Lightning web components that are built using LWC, with some special flavor related to leverage certain specific functionality of running on Lightning Platform. They are not part of the core framework. However, using LWC Open Source in combination with the CSS (framework) of your choice makes it really easy to build your own UI components. We did that here here with the ui modules in LWC Recipes OSS. Depending on your CSS needs you’ll have to make decisions about Shadow DOM, which you can read more about below. Data access On the Lightning Platform it is relatively simple to access data — you either use Apex or pre-defined Lightning Data Service methods to access data within your Salesforce org. It is different for LWC Open Source. LWC is a UI framework and doesn’t come with any data connectors. You have to define yourself how you want to access data from whatever API that you want. For connecting to APIs you can pick and choose what you need — from standard XHR requests to using the Fetch API (like we did here in LWC Recipes OSS) or any of your preferred npm packages that does that for you. This also means that you will have to handle all the things like authentication, authorization etc. on your own, as you would have to do with other UI frameworks. What is different compared to other UI frameworks (and also to the Lightning Platform) is that you can leverage the @wire decorator to build your own declarative data access. This is super useful when you want to hide the complexity of data access by using a simple decorator, and at the same time, make use of the caching capabilities of the wire-service. The package on GitHub also contains a playground with several examples on how to build your own implementation (and a rollup.js config if you don’t use lwc-services, but want to run your own project setup). Shadow DOM When you look at the different specifications that make up a “web component”, two may stand out: Custom Elements and DOM. Custom Elements, which is the ability to have your own HTML tags like rendered, is essentially the same on Lightning Platform and Open Source. The difference is that you can run your own namespace on LWC Open Source (we used three namespaces in the Recipes sample app). A more significant difference is there when it comes to the DOM — more specifically, the Shadow DOM definition. On the Lightning Platform, we use a synthetic version of Shadow DOM. This creates a virtual DOM just like React does. A virtual DOM represents an in-memory representation of the DOM, which allows us to patch the DOM behavior. This is because we have to support many old browser versions that don’t fully support native Shadow DOM. While the synthetic version behaves the similarly as the native version, you’ll notice two differences: in your browser markup you don’t see the shadow-root tag on Lightning Platform, while on the Open Source version you’ll see it. hello recipe on LWC OSS hello recipe on Lightning Platform The other difference is that because native Shadow DOM is enabled out-of-the-box for Open Source, you can’t just use a global stylesheet that then allows to cascade styles across inheriting Lightning web components. Everything is truly encapsulated, which is one of the huge benefits. You will have to rethink your CSS strategy when it comes to building Lightning web components, or if you want to reuse components that you built and styled on Lightning Platform. On the other side, you can choose with LWC Open Source to use synthetic shadow as an easier way to interoperate with existing UI if needed. Debugging This is closely related to tooling. If you follow the Salesforce Developer blog, you likely read my post about how to debug your Lightning web components. The same techniques apply to LWC Open Source, with some minor differences. Within a Salesforce org, you can switch between the minified version of your LWC code and a non-minified version by enabling debug mode. For LWC Open Source, it all depends with which parameters you build your code. Using lwc-services this is determined by the mode flag (or a custom webpack config). In watch mode, for local development, you’ll see the code as is. If you create a webpack production build, everything is minified. LWC code in webpack development build What’s also different (but at the same time similar) is the location of your LWC code in the Resources view. Typical for webpack, your local code is accessible (only in watch mode) based on your project structure. In a production build, everything is bundled up into dedicated app.js files, based on webpacks heuristics. Source code in webpack production build And now? You now learned about the main notable differences that you should be aware of if you develop LWC Open Source, and/or if you also develop on Lightning Platform. There are many things to explore for the Open Source version, like how to build your own custom wire adapters, how to share code between LWC projects, how to securely access APIs and so on. We’ll cover some of these topics — and more — in upcoming blog posts. For now, head to lwc.dev and create your first app using lwc-create-app (soon to be renamed to create-lwc-app, with some cool enhancements). Then clone the LWC Recipes OSS repo and play with the different recipes. And if you’re deep into JavaScript (or want to be), check out the source code of the LWC framework itself! About the author René Winkelmeyer works as Principal Developer Evangelist at Salesforce. He focuses on enterprise integrations, Lightning, and all the other cool stuff that you can do with the Salesforce Platform. You can follow him on Twitter @muenzpraeger.
0 notes